Overlay with Saar
In a previous post, I already explained what Overlay Mosaic Crochet is all about. But now it’s time to dive in and crochet it together! This pattern has been on my list for a while, but something always comes up. That’s why I’ve decided to share it with you as a little gift! Be warned because once you go overlay, you never crochet another way!
3/31/20252 min read
For this pattern, you can use any yarn and colors you like. You can even make it as wide as you want, as long as you keep repeating in sets of 10 stitches.
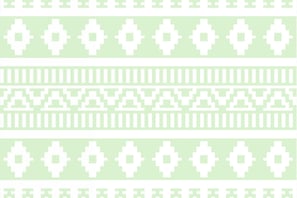
How to read the chart?
A chart pattern is always read from right to left and from bottom to top. My chart starts with a x, which stands for border stitch. A border stitch is basically just a single crochet, where you crochet through both loops of the stitch. If you're reading this blog on your mobile, scroll down to see the chart.
After the border stitch, the pattern begins, which in this case consists of 10 stitches. In the chart, I’ve used the letter "o" for overlay and a blank square. A blank square means you crochet a single crochet in the back loop of the previous row. For a square with the letter "o", you crochet a double crochet in the front loop of 2 rows below. Then, you finish your row with a border stitch, cut your yarn long enough, and start the next row from the right side. So, you always work each row from the right side.
Personally, I always crochet a chain and then cut my yarn. I prefer to knot the yarn every 2 rows and carry the yarn up to the next row. It may sound confusing, and it’s probably not exactly how Overlay Crochet is supposed to be done, but hey, rules are made to be broken! And I promise, I’ll make a video about it soon! This way, I don't have to crochet a double border, which I'm not a fan of at all
Stitches used:
Chain (ch)
Border Stitch, single crochet through both loops (x)
Single crochet back loop (sc)
Double crochet front loop 2 rows below (dc)
Light green (color A)
White (color B)
Brief written instructions
☙ Let’s get started. Crochet a foundation chain with your desired number of chains, as long as it’s divisible by 10 + 2 extra chains (those are your border stitches).
Row 1 - color A - x, 10sc, x
Row 2 - color B - x, 10sc, x
Row 3 - color A - x, 1dc, 3sc, 2dc, 3sc, 1dc, x
Row 4 - color B - x, 2sc, 1dc, 4sc, 1dc, 2sc, x
Row 5 - color A - x, 1sc, 1dc, 1sc, 1dc, 2sc, 1dc, 1sc, 1dc, 1sc, x
Row 6 - color B - x, 1dc, 3sc, 2dc, 3sc, 1dc, x
Row 7 - color A - x, 2sc, 1dc, 4sc, 1dc, 2sc, x
Row 8 - color B - x, 1dc, 3sc, 2dc, 3sc, 1dc, x
Row 9 - color A - x, 10sc, x
Row 10 - color B - x, 10dc, x
All those beautiful Overlay crochet creations may look complicated, but trust me, they really aren’t! I hope with this explanation, you’ve got the technique down. If you still have questions, don’t hesitate to reach out via the contact page or send me a message on social media.
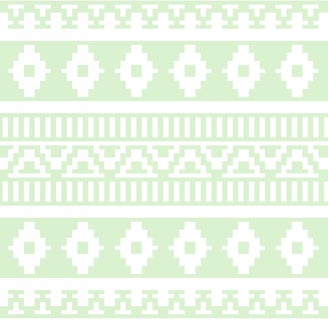
Curious about the result? Click on the image below! The base for this pattern is a chain of 80 ch + 2 ch. This means the chart pattern is repeated 8 times.
With all my patterns, you get the following:
☙ A fully written-out pattern
☙ The complete chart pattern in one large PDF, so you can use it in apps like KnitCompanion
☙ A cropped version of the chart that fits on an A4, so you can easily print it
Would you prefer this pattern as a PDF? Click the button for more information on where to purchase it.
Happy crocheting!
Haak mee met Saar
Where creativity comes to life!
Customer Service
Custom pattern or a question?
General conditions
© 2025 Haak Mee met Saar. All rights reserved. Do not copy or distribute content without permission.